
Ok then folks, as promised I will detail below this 'secret' spinning gadget of ours. The original idea came from Tom, who saw my vain efforts and frustration at using a drop spindle for the first time after years of using a wheel (and then years of not using either). Together we've developed this, thinking about speed, direction, angle of spin, plying and so on. We do have plans for revision, but only because one of the main components is Tom's favourite toy and he's been feeling bereft of it lately. Yep, it's a drill. Simple as that.
A drill? Oh yeah, one of those electrical tools, commonly used as an aid to putting up shelves, and that causes the strangest vibrations of the hands and arm when used in hammer-action mode. A drill.

But not just any drill, as I'm about to explain. Being as I live with a drill connoisseur, I tend to forget some of the basic problems with cheaper ones. My singledom corded Black & Decker was reprieved from banishment to allow me to try it for this method, but it failed on 2 scores: a) the trigger/motor wasn't sensitive enough and jolted rather a lot on slower speeds, and b) it only had two gears – normal and hammer action. So back into its dark cupboard it went.
But that doesn't mean to say that you have to have a new, expensive drill. For some reason the modern cordless ones have far more sensitive triggers; probably because the manufacturers realised they have other uses (such as screwdrivers) and so put better switches and motors on them. And you don't have to have loads of gears either; if the trigger/motor is sensitive and smooth enough, one gear is plenty. Another handy fact about drills is that they will have a reverse, as well as forwards operation. Perfect for S and Z. Yep, plying is easy done on these things, too.
So the key to getting this right is trying out and finding a suitable drill. Maybe all potential drill-spinners should pop into their local tool shop with a drop-spindle in hand and try them all for size. Or maybe not. Now, lately I've been using the top-of-the-range Makita that I bought Tom for his birthday. Yet somewhere (he tells me) he has another decent cordless drill that sadly has a bent chuck... this renders it useless for drilling but ideal for this job. Salvage then, is another option.
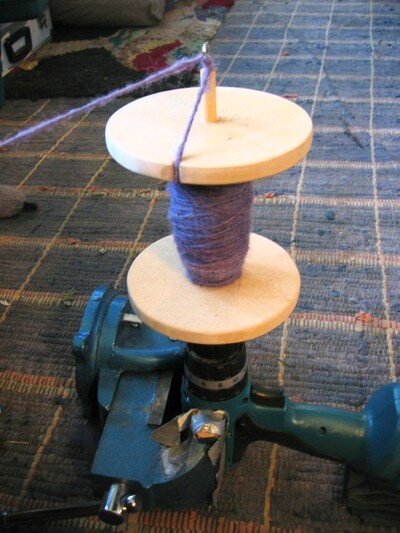
The next thing you'll need is something to secure the drill. Rather essential, really. We've got a hefty table vice which is spot on or you could use a Black & Decker Workmate or similar. Your hands (or someone else's) are no good; it's gotta be really secure so that it doesn't start drifting across the floor. You need to position the drill so the chuck is pointing directly up, and that the trigger (switch) is accessible for your feet (or hands) (and this then starts to feel more like operating a sewing machine). Please do remember though – most vices that will be large and strong enough to hold a drill in place will have nasty teeth along the edges of their jaws. To protect the drill (and not offend the person you may have borrowed it from) you'll need some fabric, cardboard and/or gaffer tape placed between the edges of the jaws and the drill (which is visible in the above photos).

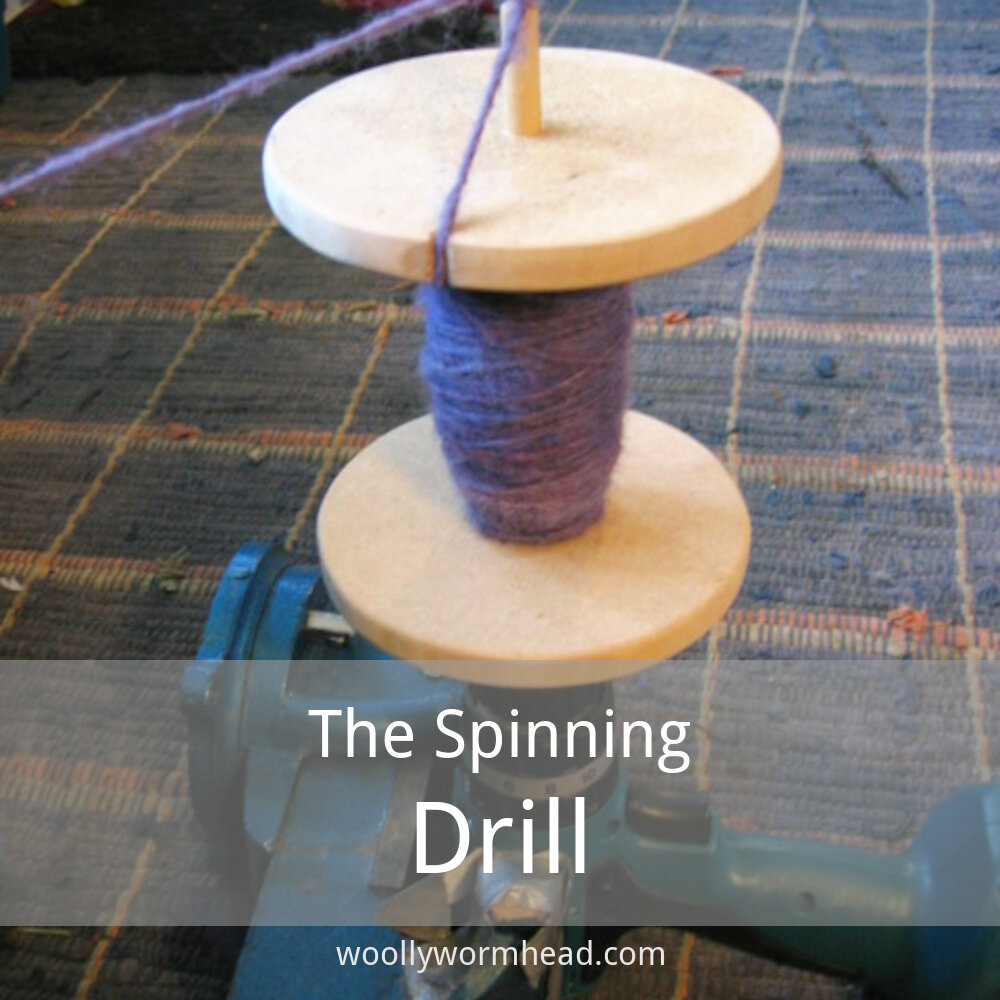
Finally, you'll need your bobbin device. This was actually the 'thing' we spent most time playing around with. To start with, I just stuck in my cheapy drop-spindle. Before long, the shaft snapped due to it being way too tall in the chuck and having a few problems with the various forces at play. So it got chopped down. It worked better, but still not perfect.
Eventually the bobbin design was achieved. The ends of the bobbins are quite large, so as to allow me to spin decent quantities of chunky yarns, but not so large as to cause problems (about the size of a CD). Having an end to the bobbin, rather than just the whorl of the spindle, adds balance; we found that once the spindle had an average quantity of yarn on it, it got top heavy and snapped again. Also, as greater speeds were achieved, (which is easy this way, trust me) the yarn wound a little too close to the chuck for my liking. So the bobbin idea works on several counts.
The bottom end of the shaft, the bit that goes into the drill, shouldn't be too long, again to avoid snapping. Also, you'll need a bit of tape around this section (although too much will make it too big for the chuck), as like the vice, chucks have teeth for gripping and will quite happily chomp away at your bobbin, shortening its life.

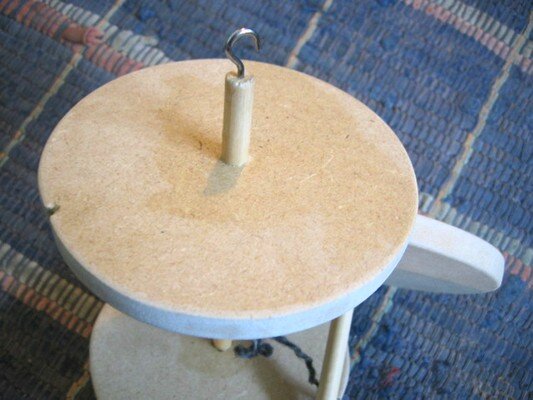
Variations of the top end of the bobbin were tried out, and we probably could spend a lot more time refining this, for different angles and so on. But this works fine for me. A simple hook, as you'd find in the top of a top-whorl spindle, is needed to guide the yarn. It can also act as a sort of brake, as spinning at speed did sometimes loosen the yarn from the hook; so just wind it round the hook a couple of times to avoid this. The other yarn guide which is rather handy is a tiny, smooth notch in the top edge of the bobbin, roughly behind the back of the hook. The notch shouldn't be too deep and should be very smooth, to avoid abrasion and snapping of your yarn. Of course, as spinners we know that the angle of your draw is important, and that applies here. Your draw/yarn being spun should sit above 45 degrees from the horizontal, else it catches on the hook.


Now, I think that's most of the technical stuff covered for the time being. Just a few more advantages to list before I leave you all to it. I mentioned before that the reverse option is great for plying. It also allows you to leave the bobbin in the chuck, yet still wind off directly to your niddy noddy, so long as you go slow enough. The bit that made me smile the most was the winding on aspect – one of the things I found most frustrating about the drop spindle was the need to stop your flow and wind on the yarn. All you do here is unhook it and operate the drill as if you were spinning - it winds on effortlessly. Mind you, will need to make sure that your initial feeder yarn is wound onto the bobbin in the same direction as you'll be operating, else it may tangle.


Obviously this method won't suit everyone, and I'm not gonna suggest you start buying drills and vices. But if you have them, it's worth giving it a shot. There's no need for wheel ratios, as the speed will vary depending on your feet and on the drill. It won't suddenly start spinning backwards as spindles and wheels do when you lose your flow. And it's fast, really fast. It's allowed me to concentrate on my draw, and so now I have producd the best yarns I've made in years. Nice one.
It's that easy, even Tom gave it a go. He's a bit of a genius, don't you think? (OK, I would say that, but I gotta thank him for developing all this, just so I can spin more yarn!)
JUST REMEMBER HEALTH & SAFETY! I'm not gonna be held liable for anything just 'cos I've shared it here, ok? Use your common sense; make sure the drill is firmly secured, tie loose hair back, don't go too fast, etc. Any questions, fire away.
Support
As always, if you have a question about this technique or need some help with it, leave a comment below! I’m afraid I’m unable to offer help via email or private message but you’re welcome to post in our forums.


