

The final modular method in this series about Hat construction is the Pieced Modular method.
Making a Hat this way has more in common with modular knitting than the other methods. ‘Modular knitting’ has become known as a particular type of knitting, made famous by creative fibre artists such as Pat Ashforth and Steve Plummer, and Vivian Hoxbro with domino knitting. Modular means to join, or be made up of smaller parts, and that gives us broad scope in terms of Hat construction.
The Tudor Cap and Hexed patterns are examples of Hats made with a pieced modular construction.
With each of these patterns, the parts that make up the Hat are the same size, and they slot together in formation. Because these 2 particular Hats are not beanies and sit away from the head, they each have a vertically knit band added so that the Hat stays on. This isn’t necessary with all Hats made this way; it really does depend on the style of the Hat and the shape of the pieces, but the majority of the Hats knit this way will be made up of smaller sections. And it’s worthwhile remembering that the pieces don’t all need to tesselate, or be the same size, to make your Hat – think of this method more like knitted patchwork.

Diagram 1: a construction schematic demonstrating the stitch and join lines for a Hat made of hexagons.
Diagram 1 shows an example of how you could create a Hat using hexagons. The solid lines represent the edges that could be joined during the making – whether they be grafted, bound off and sewn, or finished with a crochet bind-off or 3-needle bind-off. The fine dotted lines need to be joined to their neighbouring fine dotted lines to help create the 3-dimensional form that a Hat needs. And the longer dashed lines are the edges that would become part of or be used for creating the brim.

Diagram 2: a construction schematic demonstrating the stitch and join lines for a Hat made of squares.
And diagram 2 shows how we could create a simple beanie using squares. Like the hexagon version, the fine dotted lines will be joined to their neighbouring dotted lines and the dashed lines would become part of the brim.
One of the lovely things about this construction method is that the pieces don’t have to be the same size. So a beanie made from squares as shown above could be spiced up by having one or more of the key square sections made up of smaller squares in different formations.
The squares could be knit with a mitre knitting technique, which would create yet more visual interest within the pattern, especially if a variegated or gradient yarn is used. In using simple shapes, there’s lots of opportunities for creative play within that shape.

the ‘Hat of Horns

the ‘Tudor Cap’ Hat

the ‘Hexed’ Hat
And What About Techniques?
Well, this is where it really is up to you!
The beanie made of squares above would make an ideal Hat for a beginner knitter to practice their skills with, as well as use up oddments of yarn. If you’d like to practice cast-on, bind-off and seaming techniques, a beanie like this is a great place to start.
A Hat made from hexagons or other multi-side shapes would be ideal for practicing provisional cast-on and grafting techniques, but at the same time they’d also work just as well with seaming, something like a blanket stitch for a decorative finish.
This is why this construction method is so versatile – it’ll work for any skill level, and you can decide how you want to finish your Hat and which techniques to use. The shapes can be created flat or in the round or use any kind of method that you’d like to try. They can be bound off and seamed, or each started with a provisional cast-on and grafted. Or you could pick up stitches from neighbouring shapes, with each section growing from another, joining as you go.
A construction method that’s this versatile is hard to pin down and describe, but I hope this article has given you an outline and hopefully some ideas for making your own Hat from simple shapes and oddments of yarn!

Carrying on with modular construction, as we work our way through this series about the different ways to construct a hand-knit Hat, the next method I’m wanting to talk about is combined modular construction.
Beanie Bopper, Encircle and Campello patterns all combine construction methods.

the ‘Beanie Bopper’ Hat

the ‘Encircle’ Hat

the ‘Campello’ Hat
Simply put, ‘combined modular’ means we combine vertical and sideways knitting techniques in one Hat. The examples I’ll talk through today focus on two ways of doing this, but it doesn’t have to be only these two ways. What’s key is that once the Hat is finished, the stitches travel in directions that are perpendicular, or at right angles, to each other.
The Bottom-up Approach
Each of these designs features a band of knitting worked sideways, with stitches then picked up around the upper edge of the band so that the remainder of the Hat can be worked vertically. Done this way, it avoids the shaping techniques that a sideways knit Hat would require, but still adds a bit of interest that only sideways knitting can provide. It also allows us to make the most of the properties of each construction type.
In Campello, the sideways band is worked in garter stitch, which becomes incredibly stretchy when turned on its side, and the folded-up split brim would be harder to achieve without it. In Encircle, the sideways knit band is worked as a tube, which acts as an extra warm band of double knitting. And in Beanie Bopper, not only do we get the benefits of a sideways knit garter stitch brim, but also the fantastic contrast between the way the stitches travel, highlighted by the bulky handspun.

Diagram 1: this schematic of a beanie highlights how the brim can be worked sideways, with the horizontal arrow running parallel with the brim to indicate the direction of the stitches, and the rest of the Hat worked vertically.
Diagram 1 highlights how the two sections might work together.
Hats made this way don’t have to be a beanie shape; they can be any shape you want!
The section that’s worked sideways is usually the brim of the Hat or a lower band, and as that’s where the Hat needs to fit to stay on, it makes the most of the excellent properties that sideways knitting brings to a Hat.
Hats made this way may include some sideways knitting techniques – a provisional cast-on, then grafting to make the brim or band entirely seamless. If the Hat will feature a button at the brim, as it does in Ruislip, then regular cast-on and bind-off methods can be used.
Then we’ll want to pick up the stitches, and it’s mindful to note here that ‘pick up stitches’ is not the same as ‘pick up and knit’! Depending on the shape of the Hat and what’s going to happen next, knitting the stitches as you pick them up might not be helpful, so do keep an eye on that.
From there, the rest of the Hat will use techniques often found in bottom-up vertical knitting – knitting in the round, decreasing and a draw-through bind-off. Hats worked this way are rarely worked flat for the vertical knit sections, as seaming is tricky.
I tend to call this method the ‘Bottom-up Combined Modular’ method. That’s a bit of a mouthful and sounds a little daunting, yet it’s the easiest way for me to remember which is which!
The Top-down Approach
We can also approach the combined method from the other direction, and the Niamh pattern is a good example of this.
With this Hat pattern, the crown and body are worked sideways, so that those striking cables turned on their side would take centre stage. I then wanted to add a ribbed brim, and so the stitches are picked up and worked downwards, before being finished with an elastic bind-off.

Diagram 2: this schematic shows a beanie with the brim worked vertically, as directed by the arrow, and the rest of the Hat worked sideways, as shown by the horizontal arrow.
This schematic shows how the direction of the knitting, and therefore of the stitches, is different from the method above.
This is a less common way of making a Hat, as it usually involves more sideways techniques than the first one, and it’s the short rows that can be trickier to fit into the pattern. But with the right stitch pattern, it can be particularly effective.
Although there are fewer patterns for Hats made this way, it’s a useful method to know – should you make a sideways knit but find it comes up a little short when you wear it, you can simply pick up stitches around the brim and work downwards, effectively extending the length of the Hat without needing to start again.

the ‘Quoin’ Hat

the ‘Incatenato’ Hat

the ‘Niamh’ Hat
There are lots of reasons why making a Hat with a combined modular construction may appeal! Stitch patterns look particularly striking when paired with each other at right angles, and hand-dyed yarns bring a whole other dimension and can bring both the Hat and yarn to life.

That’s an awfully long title, but thankfully this way of creating a knitted Hat is a lot simpler than the title suggests! This is the next article in my series about knitted - and crochet - Hat construction.
Some examples of Woolly Wormhead designs made this way are Diagonale, Tubed and Imagiro.

the ‘Diagonale’ slouch Hat

the ‘Tubed’ slouch Hat

the ‘Imagiro’ vintage Hat
When we make a Hat this way, we start with a regular strip of knitted fabric and fold, then sew it together. It’s not a method that necessarily springs to mind when ‘modular knitting’ gets mentioned, as it doesn’t require you to join lots of pieces of knitting – though you could totally do that and make yourself a really cool Hat. It’s modular because it combines methods; it’s still pieced together, only differently. I expanded on this a little more in my Hat Construction overview article.
What I love about this method, is that it’s a fantastic way for newer knitters to make themselves a Hat, as it requires no shaping techniques – just a rectangle of knitting! And we can work this simple piece of knitting in a few different ways.
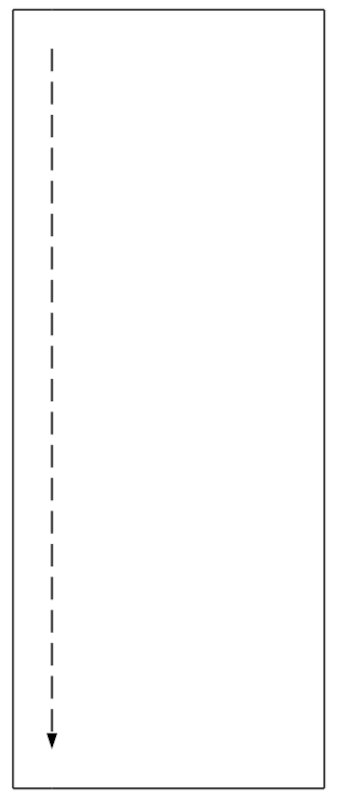
Diagram 1: the schematic shows a simple rectangle and the direction of knitting in the ‘Tubed’ Hat
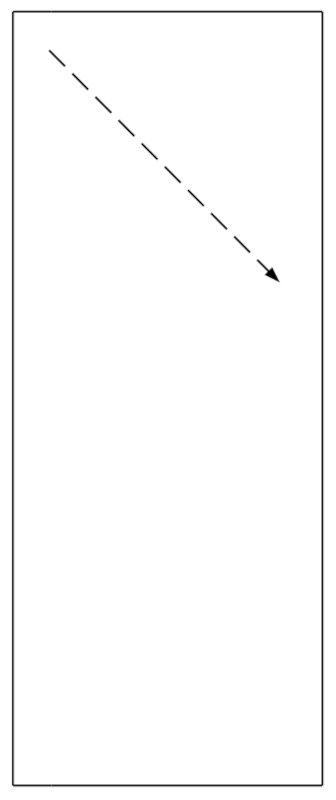
Diagram 2: the schematic shows a simple rectangle and the direction of knitting in the ‘Diagonale’ Hat
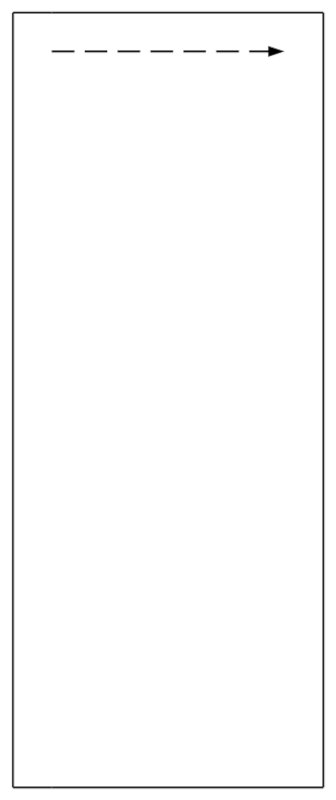
Diagram 3: the schematic shows a simple rectangle and the direction of knitting in the ‘Imagiro’ Hat
The free Tubed Hat pattern is created from a strip of knitting that’s knit vertically - as shown above in Diagram 1 above.
A number of stitches equivalent to half the circumference of the finished Hat is cast on, and the strip is cast off when the length is equivalent to twice the overall length of the Hat. The stitches lie in the same direction as the depth of the Hat until the piece is folded and the crown shaping created.
The Diagonale design introduces increase and decrease techniques, but because they’re not essential for shaping, it’s a great pattern to practice those methods with. The direction of knitting is shown in Diagram 2 above.
The use of increases and decreases creates a diagonal pattern, one that is on the bias, and so the direction of the stitches lies at 45 degrees to the depth of the Hat whilst we knit it.
Similar to the Tubed pattern, when it’s sewn together and the crown shaping formed, some of the stitches will change direction.
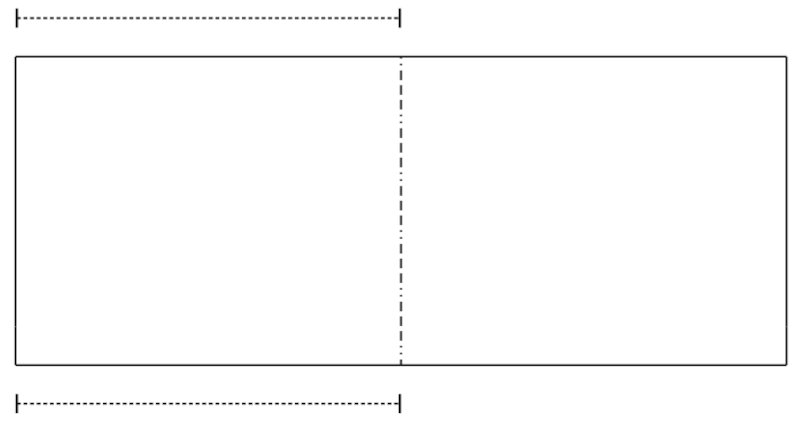
Diagram 4: this schematic indicates how the rectangle of knitting will be folded and seamed in the construction of the ‘Tubed’ and ‘Diagonale’ Hats.
The schematic above shows how we then construct our Hat once the strip of knitting is finished. The dash-dot line in the middle is where we would fold the knitting, and the fine dashed lines show us where we would then sew the knitting – I recommend the Mattress Stitch for Garter Stitch method for the Tubed and Diagonale patterns.
From there, the corners may be treated in different ways, or the brim edge may be folded up – there’s lots you can do to make your Hat different!
Sometimes the direction of knitting is different again.
The Imagiro pattern instructs you to cast on for the longest edge of the strip of knitting, and having worked this for the length of the shorter edge, it is then folded in an interesting way and stitched in place to create its unique shape. Diagram 3 above shows this rectangle in relation to the other two.

Diagram 5: this schematic highlights how a fold and a single seam can still create a Hat.
From here I hope you can see how you might wish to change the shape of your strip of knitting to create yet another different Hat when folded or sewn. Even the humble rectangle can be created in so many different ways; the possibilities are endless!

Having looked at the bottom-up method of knitting a Hat, in this article I’m going to talk about knitting a Hat the other way round. It’s still knit vertically; we just start at the top and work down.
Just as in the bottom-up method, each part of the Hat is worked separately – only we cast on for the crown, work our way into the body, then down into the brim, where we cast off for the brim edge.
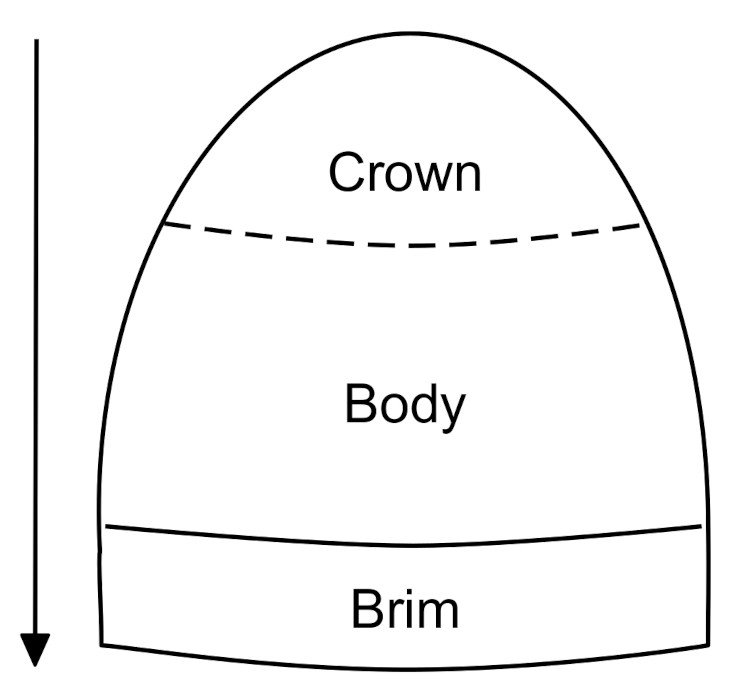
Diagram 1: the schematic shows a beanie shaped Hat with the 3 sections - crown, brim and body, marked. The arrow points downwards and indicates the direction of knitting.
Top down means just that – we start at the top of the Hat, at the very centre of the crown. To start, we would cast on the minimum number of stitches needed to begin the crown shaping. Because we’re working top-down, we’d create the crown shaping with increases, not decreases as we would when working bottom-up. Once the crown shaping is finished and the circumference of our Hat is the intended size, allowing for negative ease, we’ll continue seamlessly into the body of the Hat. The body is usually the part of a vertically knit Hat with minimal shaping, although that will depend on the style and stitch pattern.
Once the body of the Hat is finished, we’ll then start knitting the brim. If there’s a difference in circumference between the body and the brim of our Hat, then we’ll want to decrease the number of stitches on our needles to get the right size. Or if our Hat has a wide brim, we’d increase for that. Whereas with a bottom-up beret we’d increase from the brim into the body, with a top-down beret we’d decrease as we transition from the body into the brim. Top-down means we’re working the same Hat, only upside down, so everything is done in reverse – increases become decreases and vice versa.

the ‘Sette Vele’ Hat

the ‘Álfur’ Hat

the ‘Concentricity’ Hat
The brim of a top-down Hat is the last part of the Hat we’ll knit before binding off. As with any Hat, the brim may be ribbed, but it doesn’t have to be. The brim may be the only area of the Hat that needs to fit snugly around the head, which is why a ribbed brim is a popular choice – it’ll fit snugly, yet still have enough stretch for putting a Hat on or taking it off. But ribbing isn’t always a first choice for a top-down brim, as there aren’t as many options for binding off in ribbing as there are for casting on, and I personally like the challenge of finishing a top-down brim with something other than ribbing.
In my article about bottom-up vertically knit Hats, we looked a little at the internal structure of a Hat, and a top-down Hat is made up of the same parts. The diagram above shows the overall shape of a beanie, with a dotted line where the crown transitions to the body section before finally heading into the brim. It’s worth reminding ourselves that although this is how a Hat may look, what we knit is closer to a cylinder or tube that’s closed at the top – and the top of the tube is the crown shaping.
Increases vs Decreases
As we did in the bottom-up Hat article, let’s deconstruct the Hat and look at the way the crown is shaped. Although we’re aiming for a circular shape with the crown increasing, that’s not how it’ll look when the Hat is finished, because the circle smooths off as we wear the Hat.
Like the bottom-up Hat, if there isn’t enough negative ease, the lines of shaping can look quite sharp or angular. And sometimes the crown increasing is more rapid. Yet the internal structure will be pretty much the same – a tube or cylinder that’s closed at the top, and open at the bottom where it’ll sit around the head.
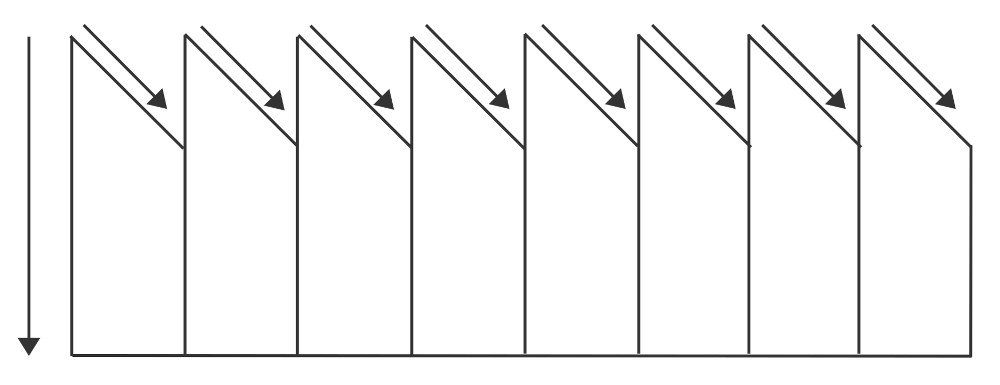
Diagram 2: this schematic shows a vertically knit Hat deconstructed. Although the panels are usually invisible, they relate to the numbers used in the crown shaping. The arrows indicate the direction of the knitting.
This next diagram shows how our Hat may look when the tube is taken apart. It’s how it’ll look if it’s worked flat. Those triangles at the top are there within the Hat when we work the crown shaping, but because the sections are all worked in one row or round, we don’t see them as separate sections – the triangles are worked consecutively as you work through the crown shaping.
This example uses a left-leaning increase like a M1L, but a crown worked with a right-leaning increase would be the same, only the triangles would lean the other way. If the crown shaping is more rapid, the angle of the triangles will change and they’ll become shorter; if we’re making a pixie Hat and the decreasing is less frequent, then the triangles will become taller.
The Pros and Cons of a Top-down Hat
I’ve said previously that the choice of decreases is one reason why I prefer a bottom-up Hat to a top-down one. In my opinion, decreases are much more varied than increases. Furthermore, decreases use existing stitches, whereas increases create stitches where there were none, and this can affect the tension of the fabric or the stitch pattern. And as briefly mentioned a few paragraphs back, the choice of bind-off methods – or at least those commonly known – isn’t as wide or as varied as cast-on methods.
All that said, top-down Hats offer lots of potential and the fact that they’re worked in reverse to a bottom-up Hat means that some of the challenges we faced previously are no longer an issue, or can even work to our advantage.
The one advantage that’s most commonly mentioned in favour of a top-down Hat is that you can keep going until you run out of yarn. Even if your brim isn’t quite as deep as intended, you can still finish the Hat without ripping back and adjusting the length of the body. This is a huge plus when you’re working with stash yarn that’s lost its ball-band, or oddments, or your handspun. And it really is a big plus – running out of yarn before you’ve finished your knitting is mighty frustrating.
Another key point is that the finished circumference of the Hat isn’t set in stone with the cast-on. Sure, if you’re part-way through the body when you discover that the Hat is too small or too big, it can be a little frustrating, but you only need to unpick to the last crown shaping rounds to change it – you don’t have to start over from scratch.
the ‘Sloochie’ Hat

the ‘Cabled Cap’ Hat

the ‘Bimple’ Hat
And that leads rather nicely into the next point – you can try the Hat on as you go – within reason. Because the increases can often be a little tighter, particularly pre-blocking, than the decreases in the crown of a bottom-up Hat, you won’t really get an accurate idea of how big the Hat is until you’ve worked a few inches or so of the body section once the shaping has finished. But at least you can try it on, and there’s less work involved in getting the right size. Heck, you could even cast on a top-down Hat before you know who it’s intended to fit and what size it should be!
A top-down Hat also makes the most common type of knit-Hat surgery easier to manage. Because the brim is the one place where a Hat has to fit, but is also the place that sees the most wear and tear, it can often need replacing. Whether it’s too big or too small, or not stretchy enough or has become overstretched over time, or it’s simply uncomfortable or itchy, you can just unpick the brim and rework it. I’m often asked how to fix a brim that’s become overstretched, either during blocking or through daily use, and if the brim is the last part of the Hat knit, it’s so much easier to modify.
The challenges to a top-down Hat – in particular the cast-on versus bind-off challenges – can also be used to our advantage. Not sure what stitch pattern to use for the brim because you’re not familiar with any ribbed bind-off methods? Then why not switch up the stitch pattern – try something different instead of ribbing! Or why not learn a new bind-off method to finish your ribbed brim? A top-down Hat can encourage us to be more creative, think outside the box, or learn new skills.
There are plenty of techniques that mirror the finishes you’d be familiar with in a bottom-up Hat. The circular cast-on, for instance, gives exactly the same finish as the draw-through bind-off that’s used at the top of a classic bottom-up crown. A tubular bind-off may sound off-putting or fiddly with its grafted edge, yet it’s a perfect mirror to a tubular cast-on and gives a mighty fine edge to ribbing, not to mention being very satisfying to finish!
Some examples of top-down Woolly Wormhead Hats are Cabled Cap, Alfur and Sette Vele.
I hope this has helped explain some of the similarities and differences between top-down and bottom-up vertically knit Hats. Each has benefits and drawbacks; there isn’t one method that’s better than the other. In the next few articles, I’m going to explore a few other ways of making the humble knit Hat, since once we break outside of the vertical methods there’s a whole other Hat construction world to explore.
Welcome to this series where I discuss various Hat construction methods! I gave an overview in this article and each of these posts will look at each of those constructions methods in more depth. Today I’m going to start with vertically knit bottom-up Hats.
The majority of hand knit Hats are made this way. And to be honest, we’ve probably never given it much thought or even wondered why we make Hats this way! In this article I’d like to delve a little deeper into the whys and wherefores of knitting a Hat from the bottom up.
Knitting a Hat this way is known as a vertical construction method, which means we knit in the direction of the depth of the Hat, from the brim to the crown. Each part of the Hat is worked separately – the brim, then the body and finally the crown; we cast on for the brim, cast off at the crown.
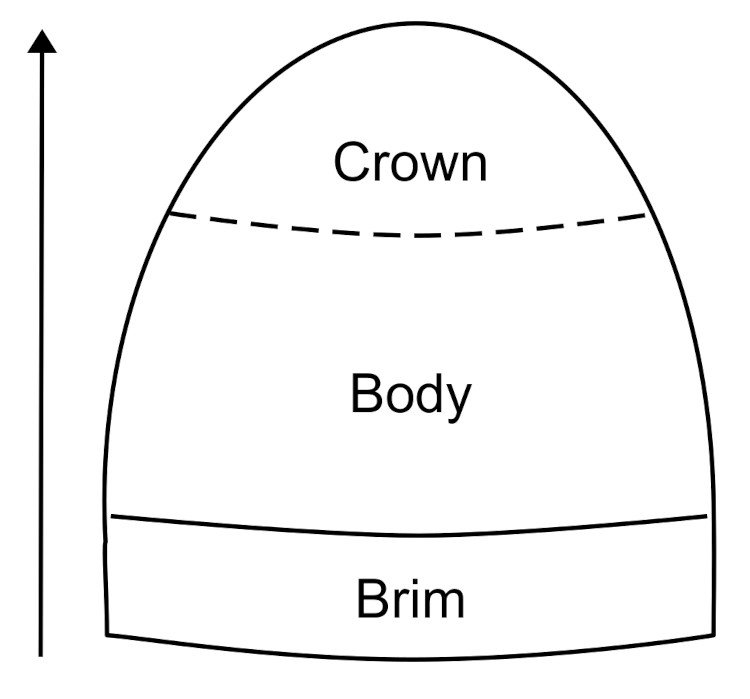
Diagram 1: the schematic shows a beanie shaped Hat with the 3 sections - brim, brim and crown - marked. The arrow points upwards and indicates the direction of knitting.
Bottom up means just that – we start at the bottom of the Hat. To start we would cast on the number of stitches needed to give us the size of brim circumference needed, with negative ease taken into account. If we’re working flat we’d add an extra stitch each end for the selvedge, so that seaming is neater and easier. If we’re working in the round, which most Woolly Wormhead vertical patterns are, you’d join in the round to knit your tube.
The brim is often ribbed but isn’t always, and neither does it have to be. The brim is where the Hat must fit, and depending on the style of Hat, it might be the only part of the Hat where the knitting is snug to the head. This is why ribbing is often used, but there are other stitch patterns and finishes that can provide enough stretch and warmth.
Once the brim is finished, the knitting continues seamlessly into the body. The stitch pattern may change, the shape of this central part of the tube may change. Either way, the body section of the tube is completed before beginning the crown shaping.
The diagram above shows the overall shape of a beanie, with a dotted line where the body transitions to the crown section but in reality, it too is entirely seamless.
A Glance at the Internal Structure of a Hat
Let’s have a closer look at Hat construction for a moment, because when we knit a Hat the shape we actually knit is a little different from the Hat-shape shown in the first diagram.
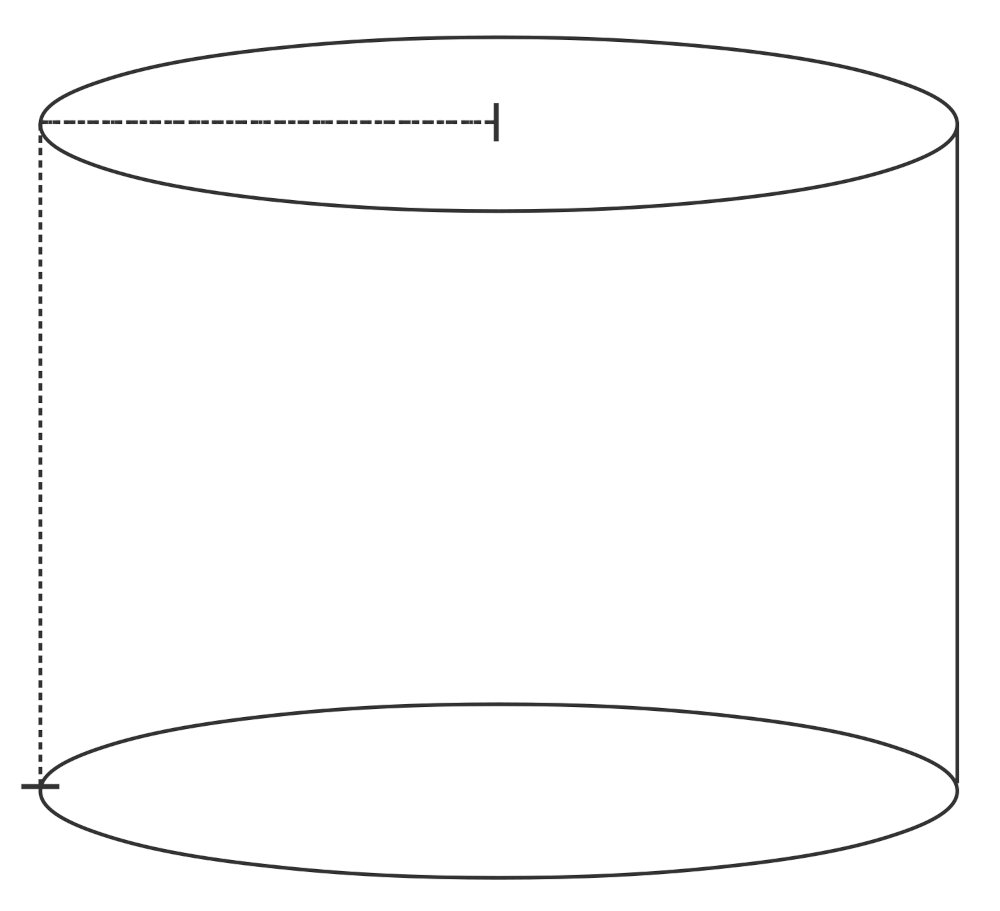
Diagram 2: this schematic shows a cylinder with a circle on top. The dashed lines indicates the full length of the Hat, from the brim to the crown.
This diagram shows what we actually knit when we knit a beanie – it’s a tube with a circle on top. The brim + the body together are the tube, the circle closing the tube is the crown. It’s really important to remember to include the radius of the circle in the overall length measurement!
When we cast on for the brim, we cast on enough stitches to start the opening of the tube, and that’s where it’ll sit around the head. We knit round and round or back and forth, adding height to the tube as it grows into the body. If we’re making a beret or slouch Hat, we may increase after the brim - different Hat styles would have a different arrangement of tubes. Once the desired length of the brim+body has been achieved, we start decreasing for the crown.
Although we’re aiming for a circular shape with the decreasing, that’s not how it’ll look when the Hat is finished - the circle smooths off as we wear the Hat, and if there isn’t enough negative ease the lines of decreasing can look quite sharp or angular.
Sometimes the crown decreasing is more rapid, or even gathered. Yet the internal structure will be pretty much the same – a tube or cylinder that’s closed at the top.
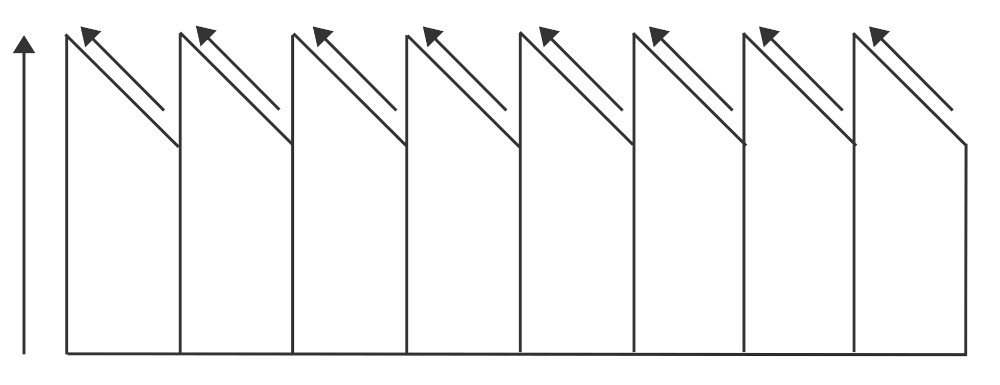
Diagram 3: this schematic shows a bottom-up beanie deconstructed. Although we don’t usually see panels in a vertically knit Hat, they are there internally and they’re dictated by the crown maths or multiples.
This next diagram shows how our Hat may look when the tube is taken apart. It’s how it’ll look if it’s worked flat. Those triangles at the top are there within the Hat when we work the crown shaping, but because the sections are all worked in one row or round, we don’t see them as separate sections – the triangles are worked consecutively as you work through the crown shaping.
This example uses a left-leaning decrease like an ssk, but a crown worked with a right-leaning or k2tog decrease would be the same, only the triangles would lean the other way. If the crown shaping is more rapid, the angle of the triangles will change and they’ll become shorter; if we’re making a pixie Hat and the decreasing is less frequent then the triangles will become taller. Pixie Hats are still a tube closed at the top, except they’re finished with a cone instead of a circle.
the ‘Adiantum’ slouch Hat

the ‘Daedalus’ stranded Hat

the ‘Laccio’ Hat
Why Bottom-up Hats are Popular
The choice of decreases is one reason why I prefer a bottom-up Hat to a top-down one. In my opinion, decreases are so much more varied and prettier than increases. My general approach to shaping in knitting is that if you can’t hide it, make a feature of it. And decreases can be so striking and architectural, especially when stacked or otherwise carefully placed. They can also be completely hidden within the pattern too.
Then there are other reasons to choose this method, besides the aesthetics of decreases. When we decrease in knitting we use stitches that are already made and knit the decreases, adding in fresh yarn. Our decreases rarely impact the tension of the fabric. Yet with the exception of a few, increases require us to create stitches from the existing fabric, which can make them a little tighter. It’s not something that’s especially noticeable in larger garments, but when increases are worked frequently in the same place, as they would be in the crown of a Hat, it can make the fabric tighter or even pucker in places.

the ‘Pebbles’ Hat

the ‘Rennie’ Hat

the ‘Sumner’ Hat
Besides increases and decreases, there are other knit tech reasons why bottom-up Hats are favoured over top-down – casting off and casting on methods. Cast-off methods can be a little tight, or not as stretchy, and generally cast-off methods are not as varied as cast-on methods. That’s not to say that they can’t be as practical or as easy to execute as cast-on methods, just that they’re not as varied or as well known. You can use any cast-on if you wanted to make a bottom-up Hat, and the draw-through bind-off for closing a top of a Hat is easy enough. Yet it’s not always as easy the other way round.
One drawback of the bottom-up method is that the circumference of the Hat isn’t adjustable after we’ve cast on, but one advantage of it is that the depth is adjustable and we can make our Hat as tall or as short as needed. You’ll always want to make sure you’ve enough yarn to finish your crown, but otherwise the depth is pretty adjustable.
There are lots of reasons why bottom-up vertically knit Hats are great, and I hope this article has helped explain why they’re so popular, as well as give a little bit of background info to the inner structure of a Hat! In the next article I’ll talk about working a Hat from the top-down.


